

Day11 Cloudformation1
回顾
昨天学习了如何配置RDS 数据库,并简单的使用它,主要是用大写,结尾一般要加;
符号很多需要每个区分好。
目标
- [ ] 了解Cloudformation
- [ ] 学会配置和简单写
1.前提准备
1.1 下载安装Git
安装完成可以在终端输入
git --version
git version 2.39.0  #可以看到我的版本号为 2.39.0
1.2 下载安装Visual Studio Code
https://code.visualstudio.com/
同样
Linux下载git
Linux里的Git和Vscode里面git是同样的东西。
2.CodeCommit
2.1 什么是CodeCommit
CodeCommit 是一种用于托管私有Git 存储库的安全、高度可扩展的托管源代码控制服务。 借助CodeCommit,您无需管理自己的源代码控制系统或担心其基础设施的扩展。 您可以使用CodeCommit 存储从代码到二进制文件的一切内容。 它支持Git 的标准功能,可与您现有的基于Git 的工具无缝协作。
2.2 创建一个リポジトリ
- 我们在Aws上打开CodeCommit。
- 进入リポジトリ、リポジトリ是一个放代码的仓库。和Git开放的库不一样,他是一个只存放代码的库。
- 点击リポジトリを作成
- 输入名称(qlite-dev-xxx-repo)直接创建
- 点击仓库的ファイルの作成我们来随便做一个玩玩
- 随便输入点内容,输入完成后填入文件名和作者名,自己的邮箱和留言。
- 点击変更のコミット完成。
2.3 测试克隆一个仓库
-
进入跳板机
-
下载Git并克隆
sudo yum -y install git

git clone https://git-codecommit.ap-northeast-1.amazonaws.com/v1/repos/qlite-dev-xxx-repo
git clone为克隆命令
这里的连接为仓库地址,可以在网页リポジトリ里找到https://git-codecommit.ap-northeast-1.amazonaws.com/v1/repos
-
在输完上面的克隆命令会提示
Username for 'https://git-codecommit.ap-northeast-1.amazonaws.com':提示我们需要用户名和密码。
-
我们去找我们的用户名和密码
来到aws网页右上角点击自己的账户,选择セキュリティ認証情報
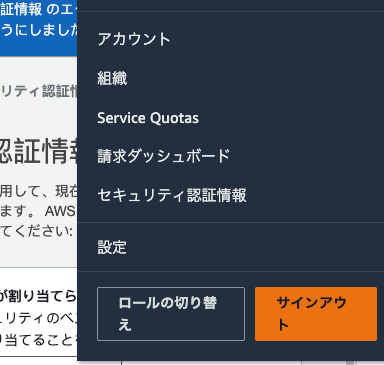
找到WS CodeCommit 認証情報里面的AWS CodeCommit の HTTPS Git 認証情報
选择認証情報を生成
下载自己的认证文件。
-
回到我们的终端,粘贴下载下来的认证文件里的用户名和密码。
Password for 'https://tutu01-at-318752096736@git-codecommit.ap-northeast-1.amazonaws.com':
remote: Counting objects: 6, done.
Unpacking objects: 100% (6/6), 430 bytes | 430.00 KiB/s, done.
可以看到克隆成功了。
看看有没有刚刚的文件
cd qlite-dev-xxx-repo ls 0119test.txt #发现刚刚自己在网页上创建的文件 -
温馨提示⚠️:我们要使用git的时候第一步就是克隆库,
想要成为老司机学会上面的步骤很重要。( ;∀;)
2.4 尝试修改内容并推送
-
我们修改一下119test.txt这个文件
vim 0119test.txt #编辑一下增添一下内容 #输入git diff 文件名 可以对比修改的内容 git diff 0119test.txt diff --git a/0119test.txt b/0119test.txt index f4b0b7f..643b3a9 100644 --- a/0119test.txt +++ b/0119test.txt @@ -1,2 +1,3 @@ 123456 -print("aaa") \ No newline at end of file +print("aaa") #可以看到我添加了print("aaa")和woaixuexi +woaixuexi -
我们使用
git status来查看当前状态git status On branch main Your branch is up to date with 'origin/main'. Changes not staged for commit: (use "git add..." to update what will be committed) (use "git restore ..." to discard changes in working directory) modified: 0119test.txt #我们可以看到这一行是红色的 no changes added to commit (use "git add" and/or "git commit -a") -
然后我们把文件送到待上传的状态
git add 0119test.txt添加完成我们再输入
git status On branch main Your branch is up to date with 'origin/main'. Changes to be committed: (use "git restore --staged..." to unstage) modified: 0119test.txt #可以看到变成绿色了 变成绿色就是添加待上传了。
-
如果这个时候我们使用推送,我们会发现网页上并没有推送上来,我们回到Linux终端
输入
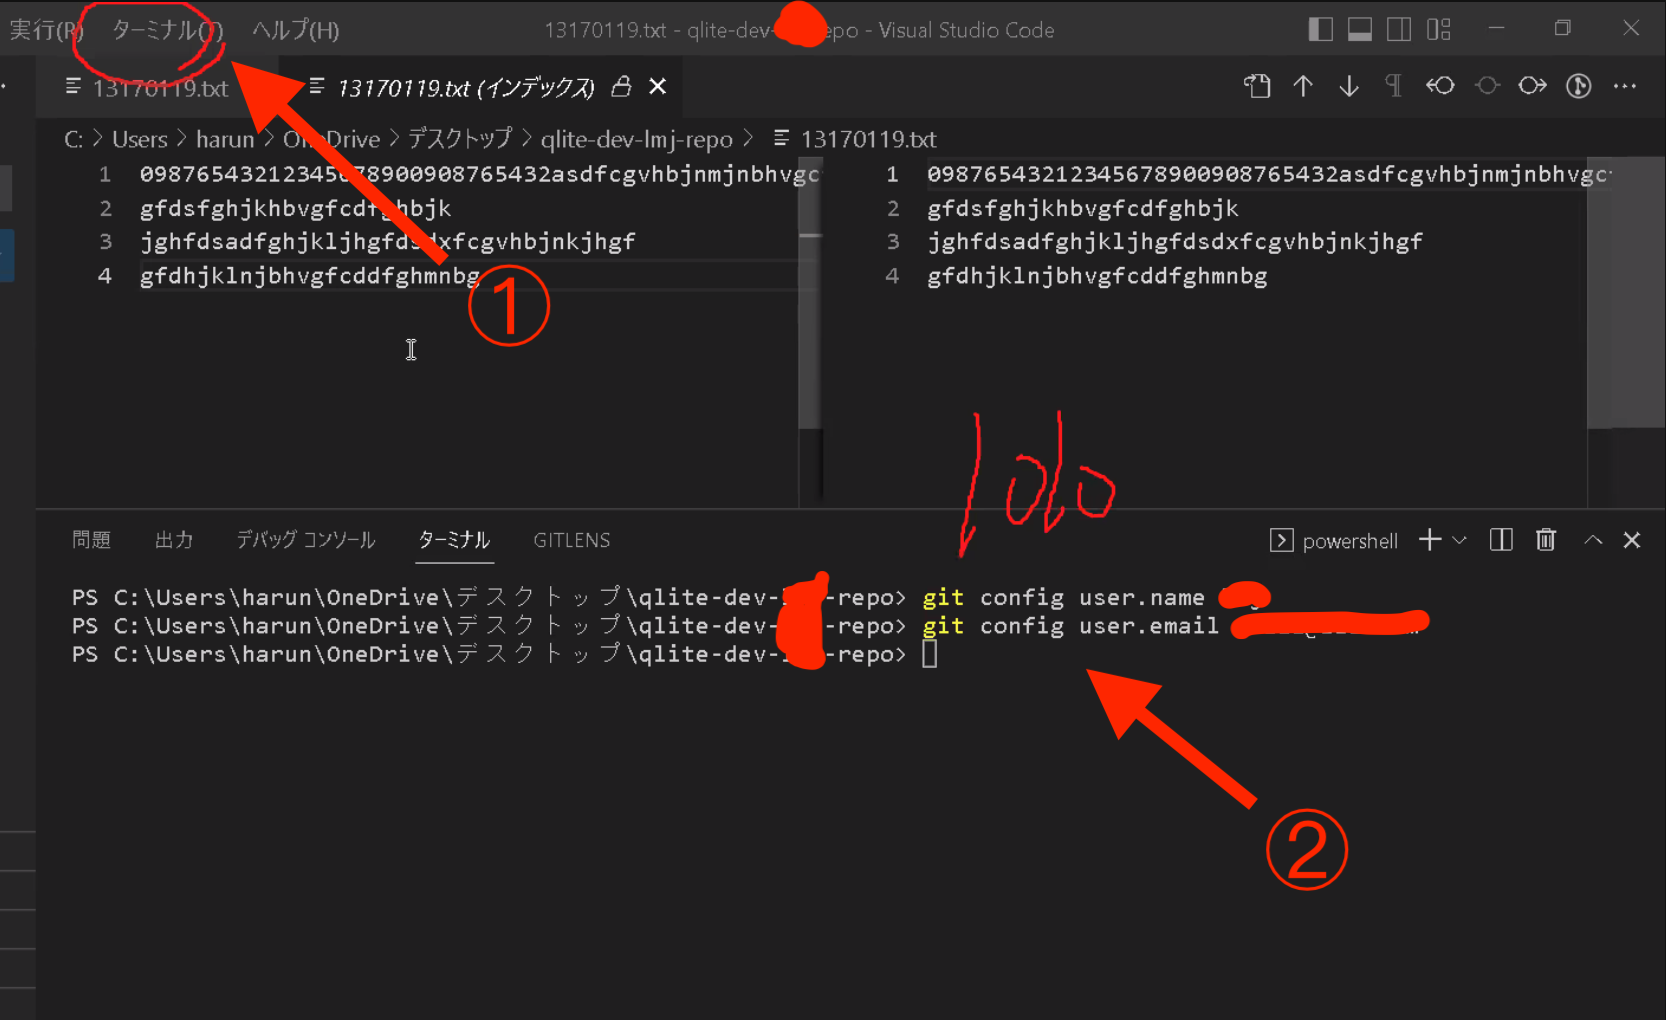
git commit -m ":)1" #添加一个commit为 :)1输入完我们回车发现需要我们配置用户名和邮箱
Author identity unknown *** Please tell me who you are. Run git config --global user.email "[email protected]" git config --global user.name "Your Name" -
我们来配置一下用户名和邮箱
git config user.name "用户名" git config user.email "email" -
配置完成我们再添加一个commit
git commit -m ":)1" #添加一个commit为 :)1发现正常添加。
-
最后我们推送
git push会要求我们输入aws之前的用户名和密码
填入AWS CodeCommit の HTTPS Git 認証情報的用户名和密码可以正常推送。
完成。
-
再说一下怎么同步仓库内容
git pull
3.VS Code
3.1 VS Code简介
Visual Studio Code(简称 VS Code)是一款由微软开发且跨平台的免费源代码编辑器[8]。该软件支持语法高亮、代码自动补全(又称 IntelliSense(英语:IntelliSense))、代码重构功能,并且内置了命令行工具和 Git 版本控制系统[9]。用户可以更改主题和键盘快捷方式实现个性化设置,也可以通过内置的扩展程序商店安装扩展以拓展软件功能。
属于一个IDE(集成开发环境)
3.2克隆库和同步库
-
克隆库依次点击1,2,3
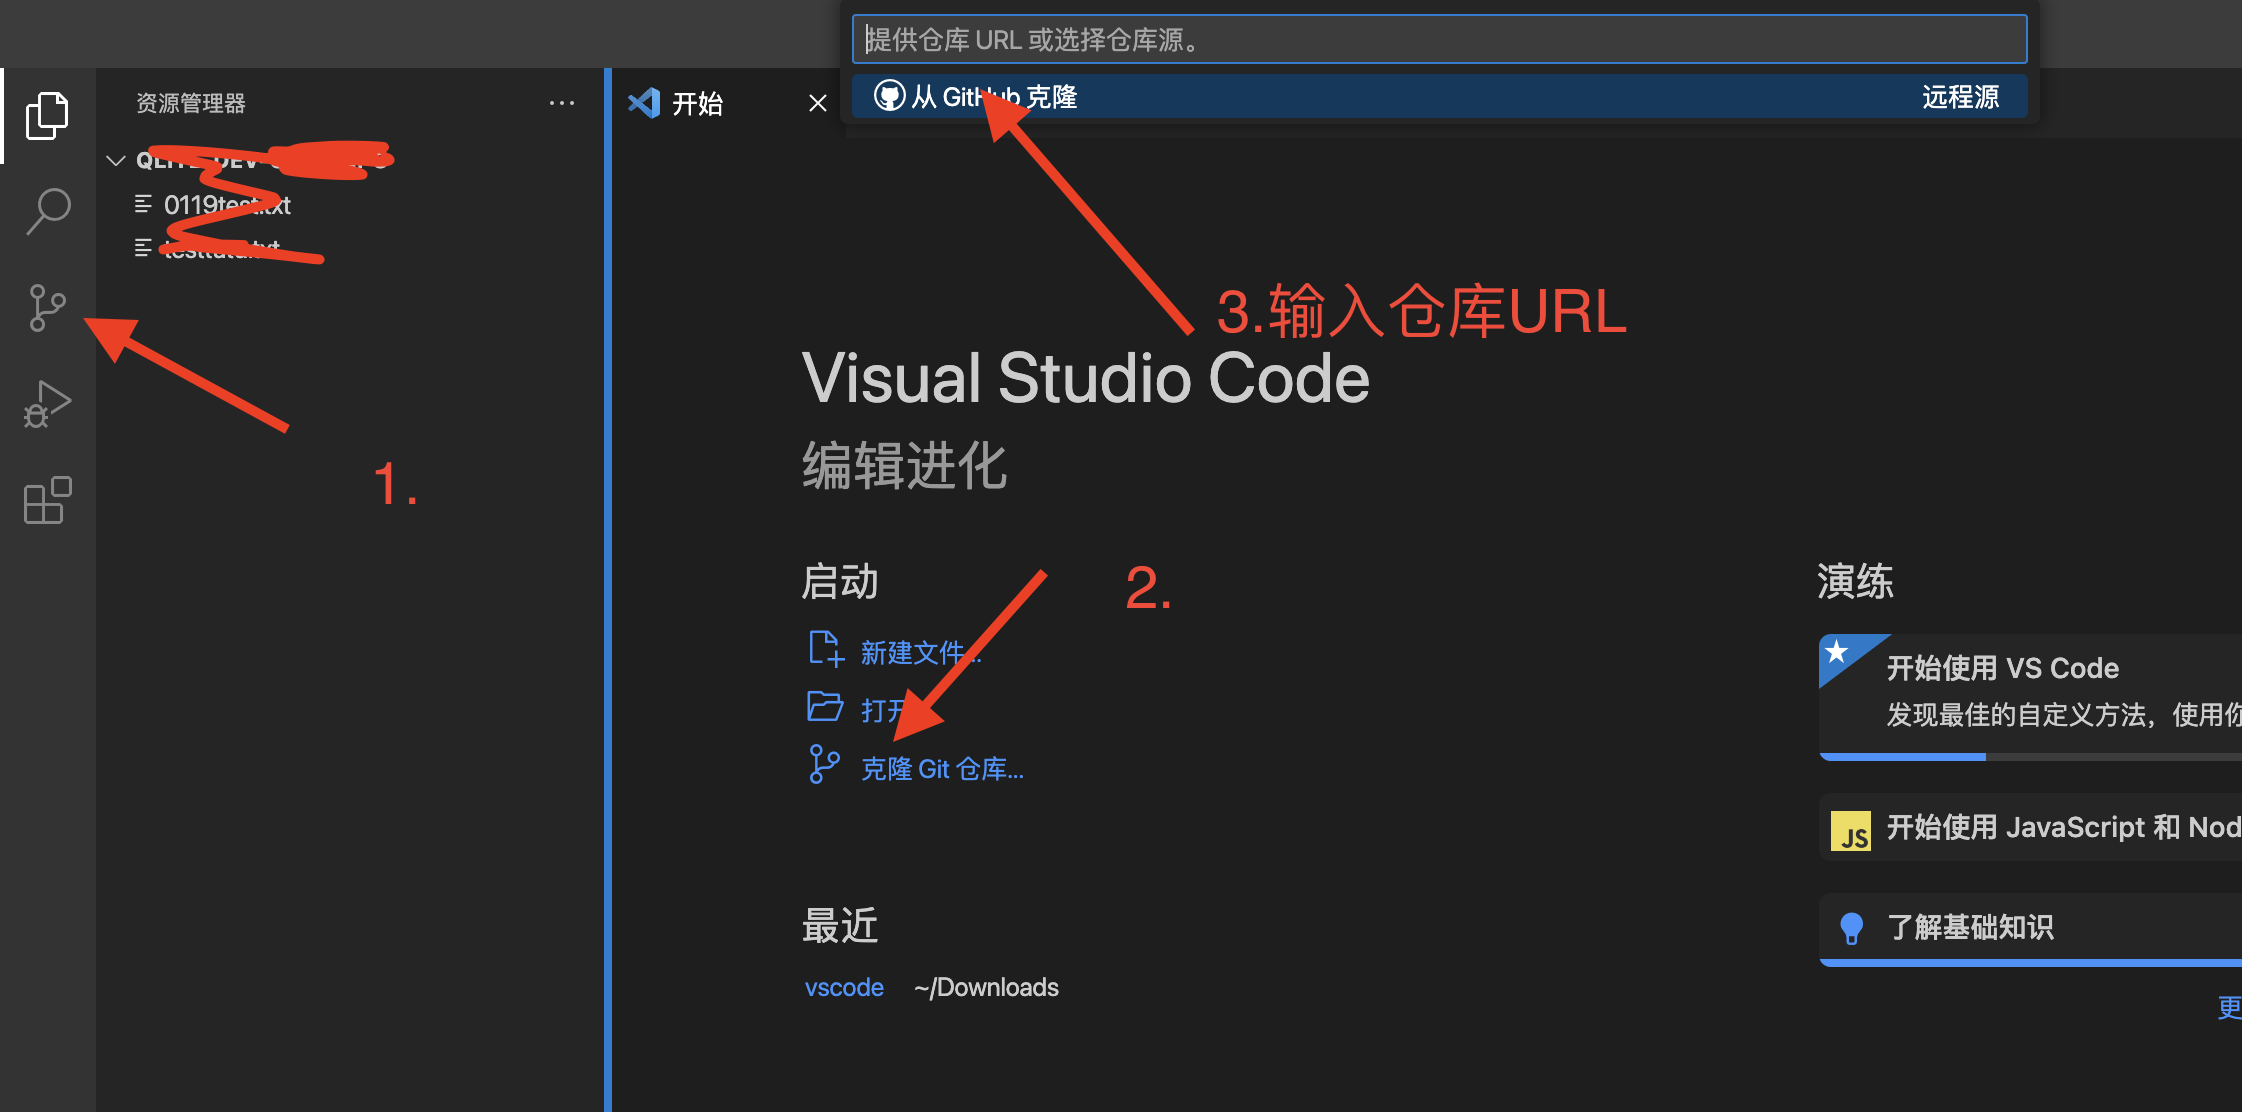
输入URL然后我们会发现上面输入url的地方要求我们输入用户名和密码。
和Linux一样,我们输入AWS认证信息的账号密码。
-
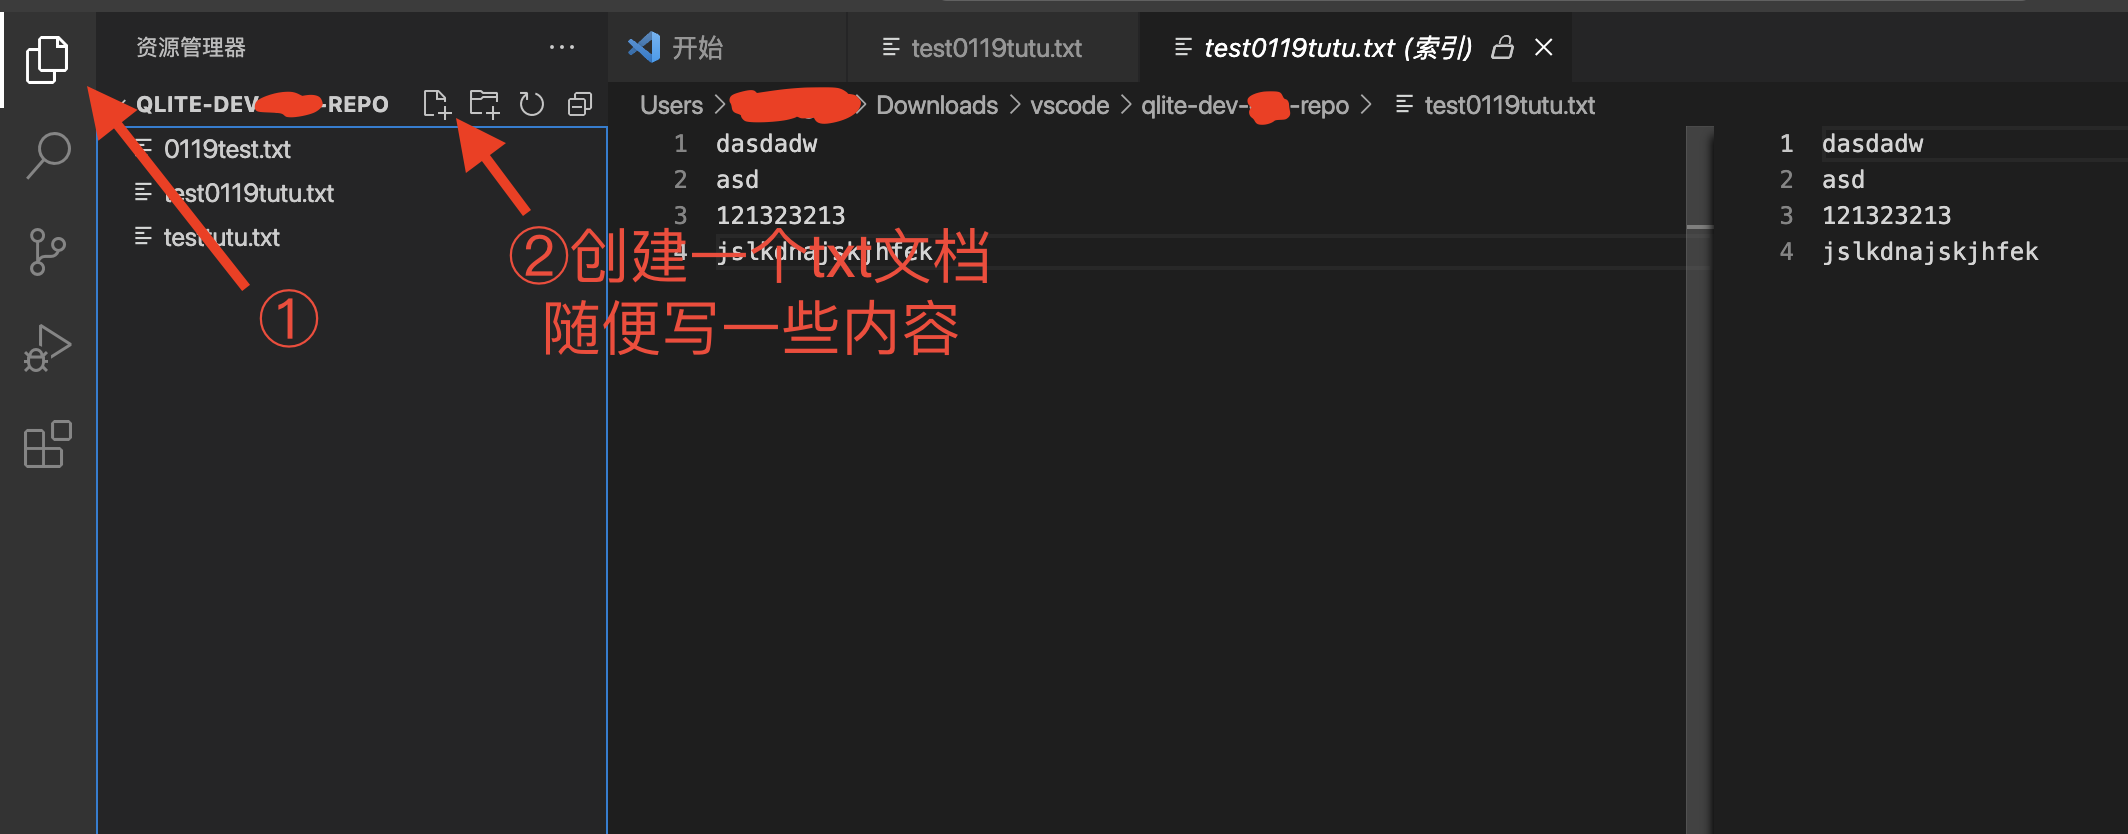
我们随便创建一个txt写入一些内容
写完之后保存。
-
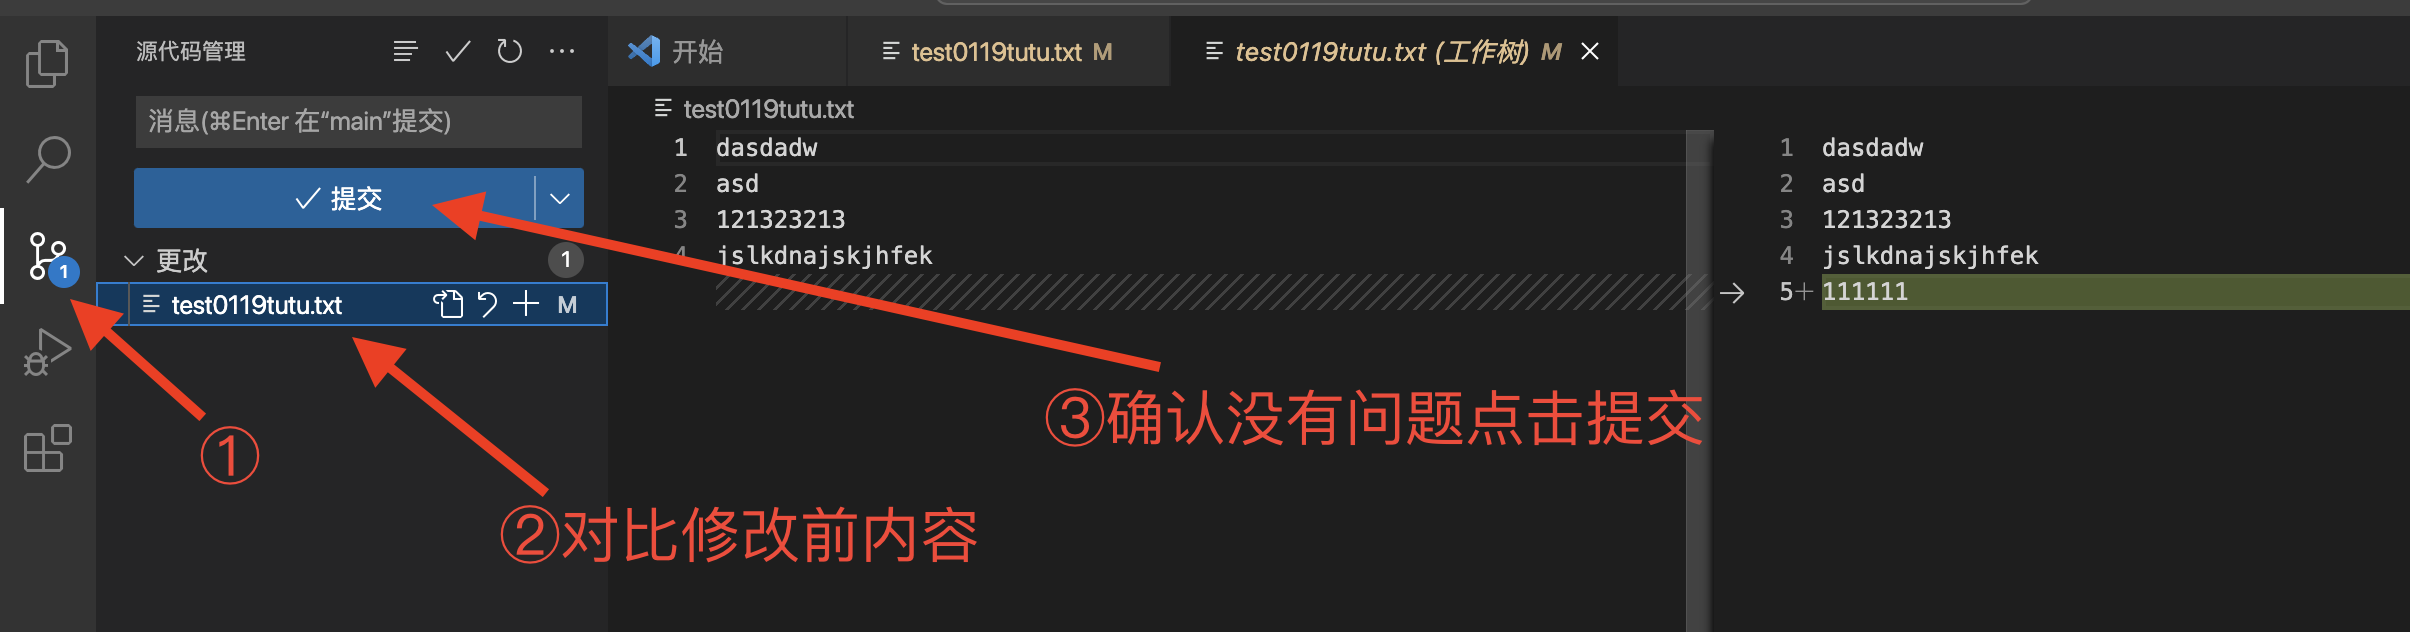
和保存之后回到git能看到add添加到了待上传区域。
点一下文本甚至可以对比内容,最后输入消息后提交。
-
点击提交发现不行怎么办,和上面Linux一样我们需要配置用户名和邮箱
git config user.name "用户名" git config user.email "email" -
完成上面操作后我们正常推送
发现又让我们输入AWS的认证信息,输入用户名和密码完成同步。
4.AWS CloudFormation
通过CloudFormation我们可以直接用代码直接帮我们创建AWS的资源
今天我们按之前创建VPC的步骤来创建一个资源。
CloudFormation模版
利用好模版,可以让我们事半功倍!
一定要学会找模版!
其实亚马逊的文档里面有很多现成模版(yaml)
如何找模版?
-
点击右上角的 ?
-
找到ドキュメンテーション
-
マネジメントとガバナンス
-
找到AWS CloudFormation点击
-
点击ユーザーガイド
-
テンプレートリファレンス里面的リソースおよびプロパティのリファレンス
-
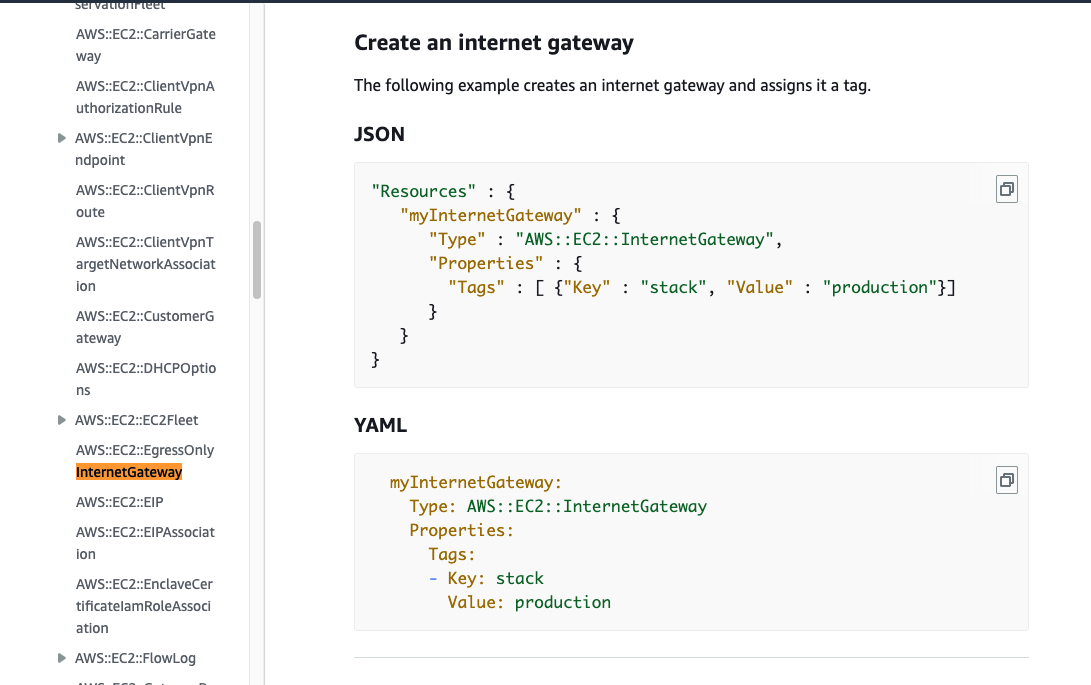
找到Amazon EC2的AWS::EC2::VPC
我们来看看YAML(ヤムル)文件模版
myVPC:
 Type: AWS::EC2::VPC
 Properties:
   CidrBlock: 10.0.0.0/16
   EnableDnsSupport: 'true'
   EnableDnsHostnames: 'true'
   Tags:
    - Key: stack
      Value: production
都能自定义。
4.2 在VScode里安装插件CloudFormation Snippets
CloudFormation Snippets是自动补全模版的插件
自动补全模版快捷键
windows快捷键为
win+space
Mac快捷键为
command+i键
自动注释
windows快捷键为
ctrl+/?
快捷键为
command+/?键
注意⚠️:逻辑ID因为要引用,尽量精简好记
4.3正式练习

根据上图来创建资源。
我们一步一步来,我接下来会写如何根据找来的模版来写。
-
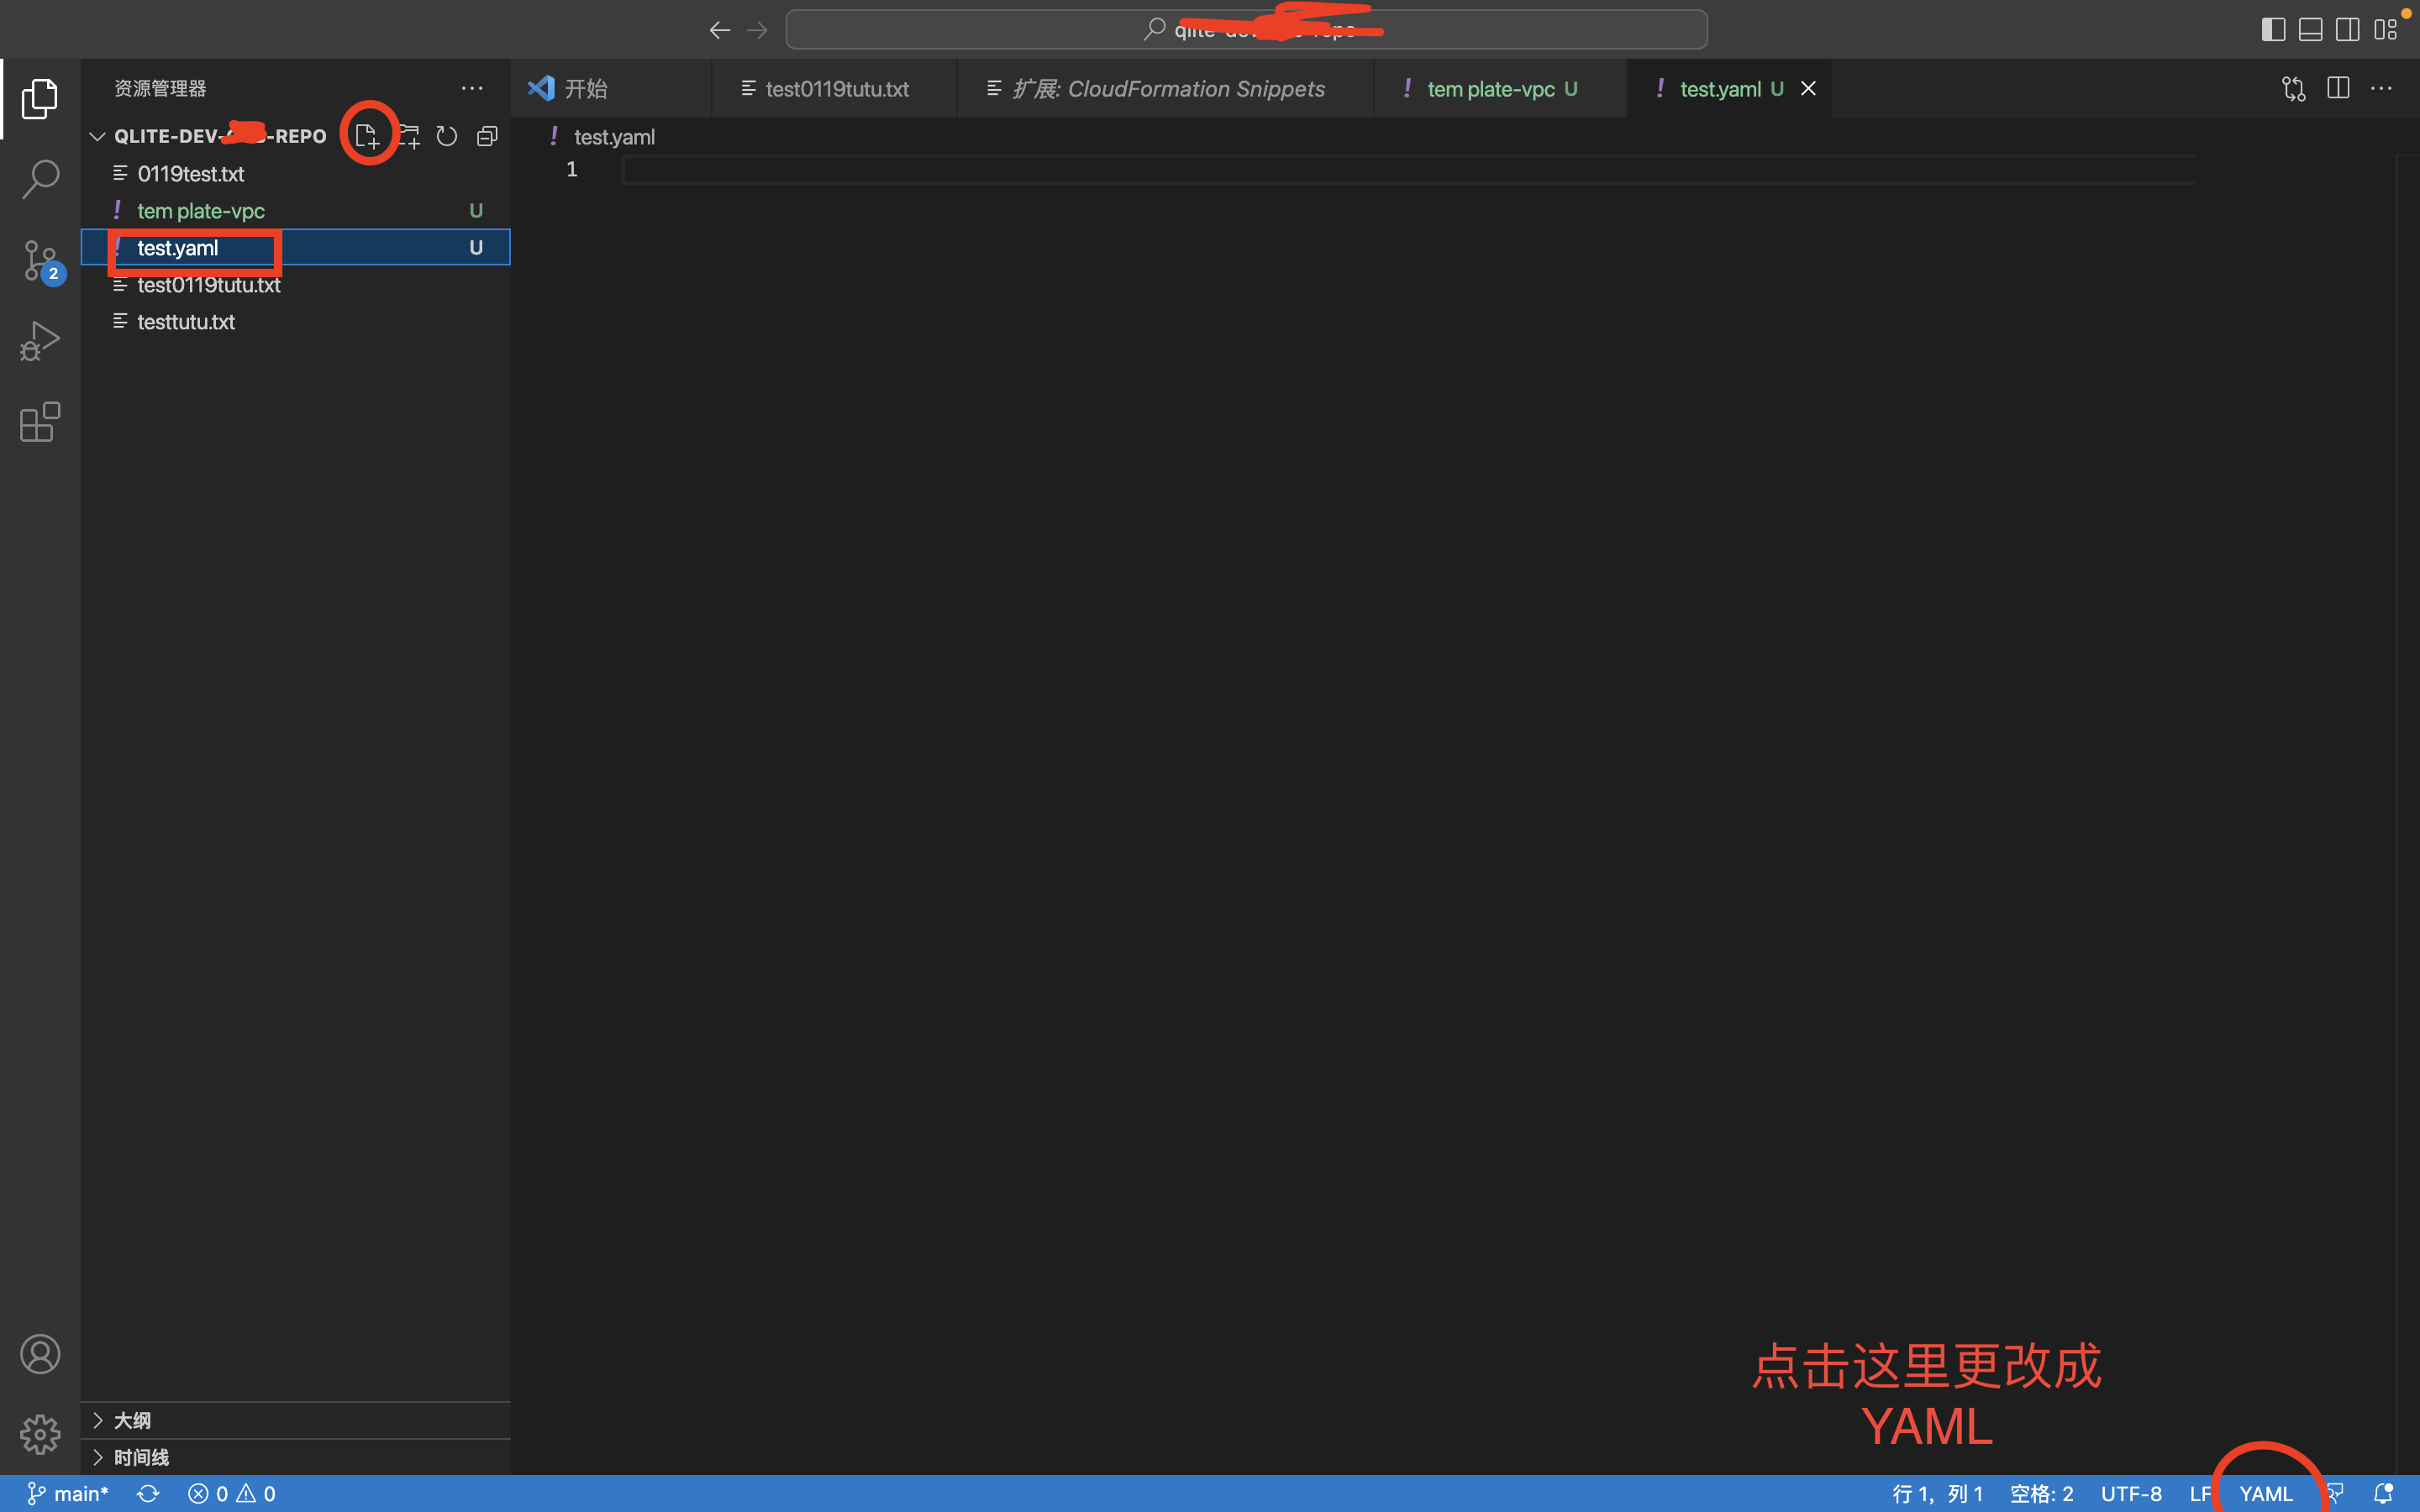
在VScode里创建一个yaml文件
-
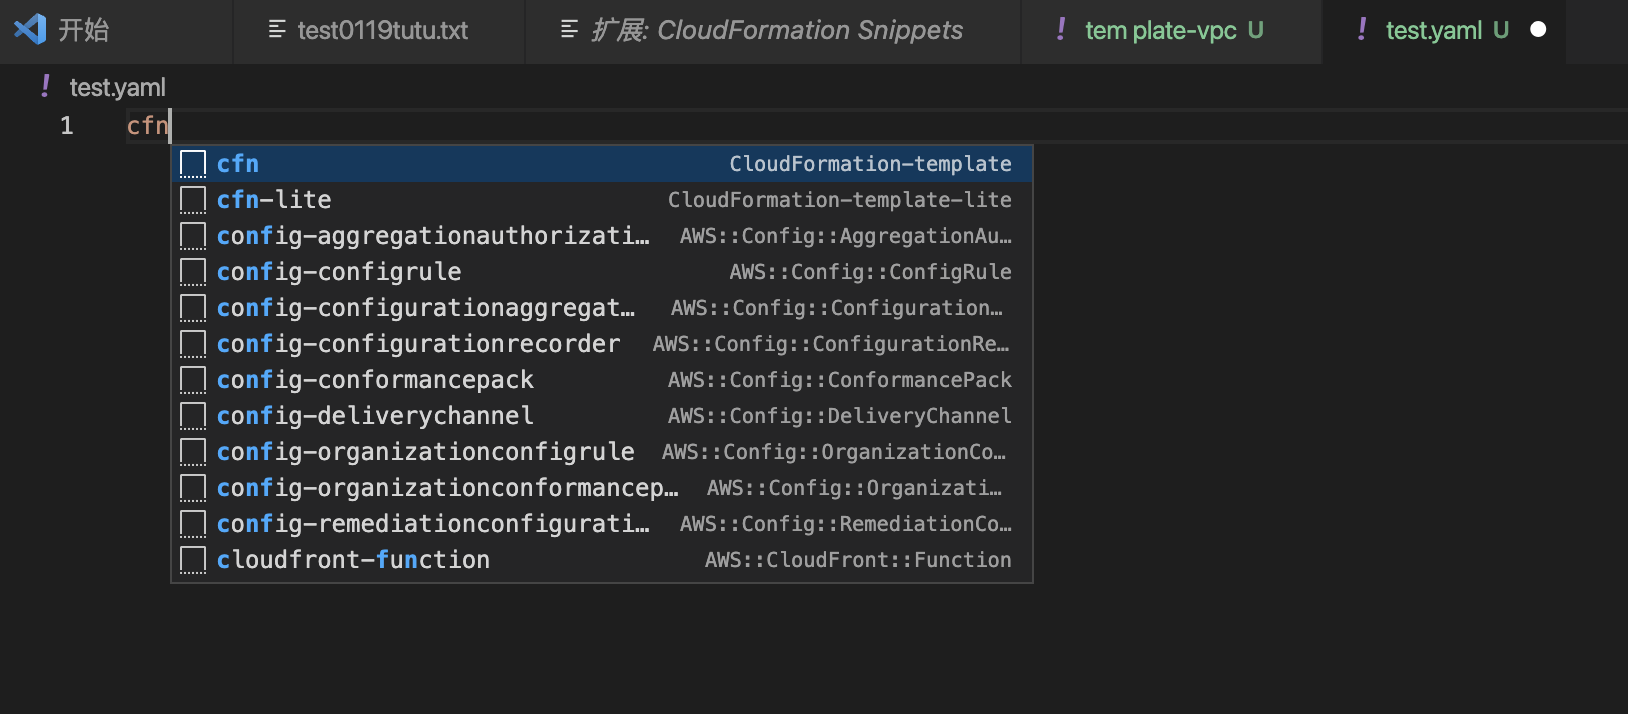
输入cfn直接使用快捷键联想
-
然后我们选中所有注释掉放开Resources:
4.3.1创建VPC
我们先来创建个VPC
看看官方文档
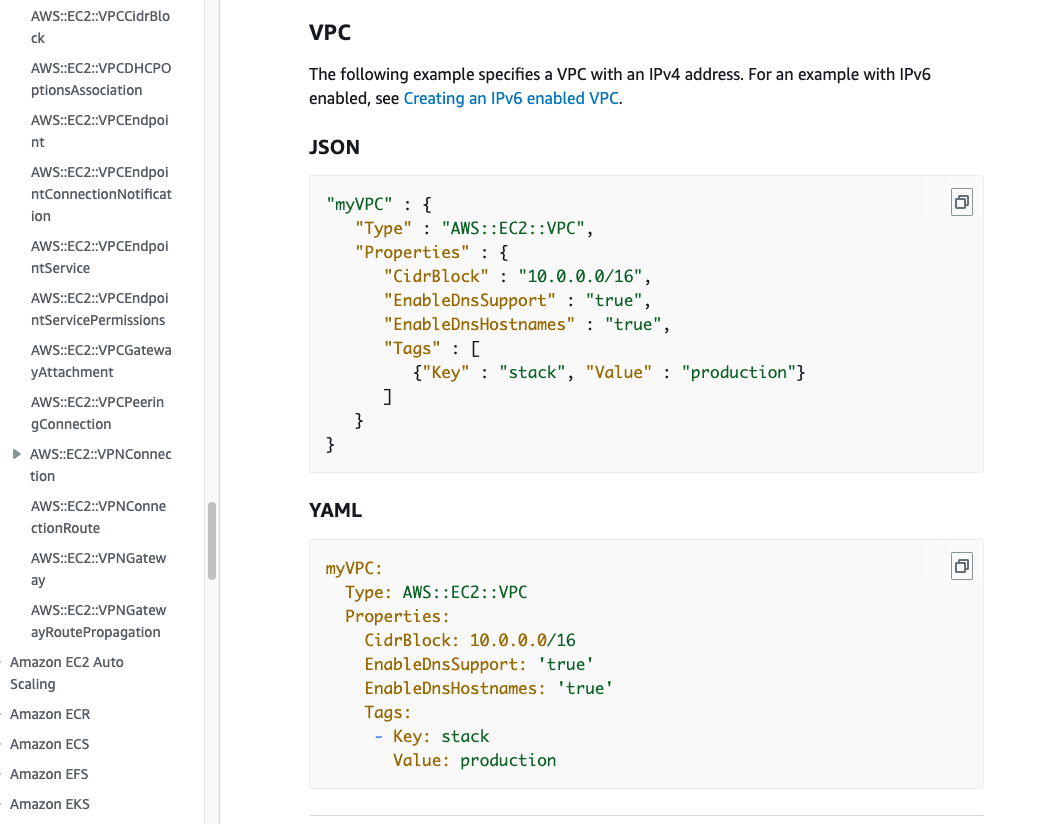
直接复制模版来写。
Resources:

  myVPC:
    Type: AWS::EC2::VPC
    Properties:
      CidrBlock: 10.0.0.0/16
      EnableDnsSupport: 'true'
      EnableDnsHostnames: 'true'
      Tags:
       - Key: name
         Value: qlite-dev-xxx123-vpc
4.3.2创建igw(インネットゲートウェイ/InternetGateway)
-
我们可以直接输入igw然后快捷键来联想,也可以去找模版。
根据模版写出来
Resources:

  xxxvpc:
    Type: AWS::EC2::VPC
    Properties:
      CidrBlock: 10.10.0.0/16
      # EnableDnsHostnames: false
      # EnableDnsSupport: false
      # InstanceTenancy: "String"
      # Ipv4IpamPoolId: "String"
      # Ipv4NetmaskLength: Number
      Tags:
       - Key: name
         Value: qlite-dev-xxx123-vpc

  xxxigw:
    Type: AWS::EC2::InternetGateway
    Properties:
      Tags:
      - Key: name
        Value: vqlite-dev-xxx123-igw
4.3.3关联网关
依葫芦画瓢

模仿模版写入
Resources:

  xxxvpc:
    Type: AWS::EC2::VPC
    Properties:
      CidrBlock: 10.10.0.0/16
      # EnableDnsHostnames: false
      # EnableDnsSupport: false
      # InstanceTenancy: "String"
      # Ipv4IpamPoolId: "String"
      # Ipv4NetmaskLength: Number
      Tags:
       - Key: name
         Value: qlite-dev-xxx123-vpc

  xxxigw:
    Type: AWS::EC2::InternetGateway
    Properties:
      Tags:
      - Key: name
        Value: vqlite-dev-xxx123-igw

  xxxattach:
    Type: AWS::EC2::VPCGatewayAttachment
    Properties:
      InternetGatewayId: !Ref xxxigw   #引用的时候要输入 !Ref
      VpcId: !Ref xxxvpc
      # VpnGatewayId: "String"
4.3.4创建所有资源
看完上面的步骤,我相信一般你就会了,依葫芦画瓢昨晚所有资源。
# AWSTemplateFormatVersion: 2010-09-09
# Description: |

# Parameters:

# Metadata:

# Mappings:

# Conditions:

Resources:

  xxxvpc:
    Type: AWS::EC2::VPC
    Properties:
      CidrBlock: 10.10.0.0/16
      Tags:
       - Key: Name
         Value: qlite-dev-xxx123-vpc
  xxxigw:
    Type: AWS::EC2::InternetGateway
    Properties:
      Tags:
      - Key: Name
        Value: vqlite-dev-xxx123-igw
  xxxattach:
    Type: AWS::EC2::VPCGatewayAttachment
    Properties:
      InternetGatewayId: !Ref xxxigw
      VpcId: !Ref xxxvpc
      # VpnGatewayId: "String"

  xxxpub1a:
    Type: AWS::EC2::Subnet
    Properties:
      # AssignIpv6AddressOnCreation: false
      AvailabilityZone: ap-northeast-1a
      # AvailabilityZoneId: "String"
      CidrBlock: "10.10.0.0/24"
      Tags:
       - Key: Name
         Value: qlite-dev-xxx123-subnet-pub1a
      VpcId: !Ref xxxvpc # Required

  xxxpub1c:
    Type: AWS::EC2::Subnet
    Properties:
      # AssignIpv6AddressOnCreation: false
      AvailabilityZone: ap-northeast-1c
      # AvailabilityZoneId: "String"
      CidrBlock: "10.10.1.0/24"
      Tags:
       - Key: Name
         Value: qlite-dev-xxx123-subnet-pub1c
      VpcId: !Ref xxxvpc # Required

  xxxpri1a:
    Type: AWS::EC2::Subnet
    Properties:
      # AssignIpv6AddressOnCreation: false
      AvailabilityZone: ap-northeast-1a
      # AvailabilityZoneId: "String"
      CidrBlock: "10.10.2.0/24"
      Tags:
       - Key: Name
         Value: qlite-dev-xxx123-subnet-pri1a
      VpcId: !Ref xxxvpc # Required

  xxxpri1c:
    Type: AWS::EC2::Subnet
    Properties:
      # AssignIpv6AddressOnCreation: false
      AvailabilityZone: ap-northeast-1c
      # AvailabilityZoneId: "String"
      CidrBlock: "10.10.3.0/24"
      Tags:
       - Key: Name
         Value: qlite-dev-xxx123-subnet-pri1c
      VpcId: !Ref xxxvpc # Required

  xxxrtbpub:
    Type: AWS::EC2::RouteTable
    Properties:
      Tags:
      - Key: Name
        Value: qlite-dev-xxx123-rtb-pub
      VpcId: !Ref xxxvpc # Required

  xxxrtbpri1a:
    Type: AWS::EC2::RouteTable
    Properties:
      Tags:
       - Key: Name
         Value: qlite-dev-xxx123-rtb-pri1a
      VpcId: !Ref xxxvpc # Required

  xxxrtbpri1c:
    Type: AWS::EC2::RouteTable
    Properties:
      Tags:
       - Key: Name
         Value: qlite-dev-xxx123-rtb-pri1c
      VpcId: !Ref xxxvpc # Required

  xxxrtbbactpub1a:
      Type: AWS::EC2::SubnetRouteTableAssociation
      Properties:
        RouteTableId: !Ref xxxrtbpub
        SubnetId: !Ref xxxpub1a # Required

  xxxrtbbactpub1c:
      Type: AWS::EC2::SubnetRouteTableAssociation
      Properties:
        RouteTableId: !Ref xxxrtbpub
        SubnetId: !Ref xxxpub1c # Required

  xxxrtbbactpri1a:
      Type: AWS::EC2::SubnetRouteTableAssociation
      Properties:
        RouteTableId: !Ref xxxrtbpri1a
        SubnetId: !Ref xxxpri1a # Required

  xxxrtbbactpri1c:
      Type: AWS::EC2::SubnetRouteTableAssociation
      Properties:
        RouteTableId: !Ref xxxrtbpri1c
        SubnetId: !Ref xxxpri1c # Required
  MyInternetGatewayRoute1:
    Type: 'AWS::EC2::Route'
    Properties:
      RouteTableId: !Ref xxxrtbpub
      DestinationCidrBlock: 0.0.0.0/0
      GatewayId: !Ref xxxigw
  NATGateway:
    Type: AWS::EC2::NatGateway
    Properties:
        AllocationId: !GetAtt NATGatewayEIP.AllocationId
        SubnetId: !Ref xxxpub1a
  NATGatewayEIP:
    Type: AWS::EC2::EIP
    Properties:
        Domain: !Ref xxxvpc
  RouteNATGateway:
    DependsOn: NATGateway
    Type: AWS::EC2::Route
    Properties:
        RouteTableId: !Ref xxxrtbpub
        DestinationCidrBlock: '0.0.0.0/0'
        NatGatewayId: !Ref NATGateway
# Transform:

# Outputs:
测试
最后我们来到AWS看看自己写的yaml能不能跑起来。
来到CloudFormation
-
スタックの作成
-
テンプレートの指定选择テンプレートファイルのアップロード
-
然后上传自己的yaml文件
-
上传完成一口气点完次へ
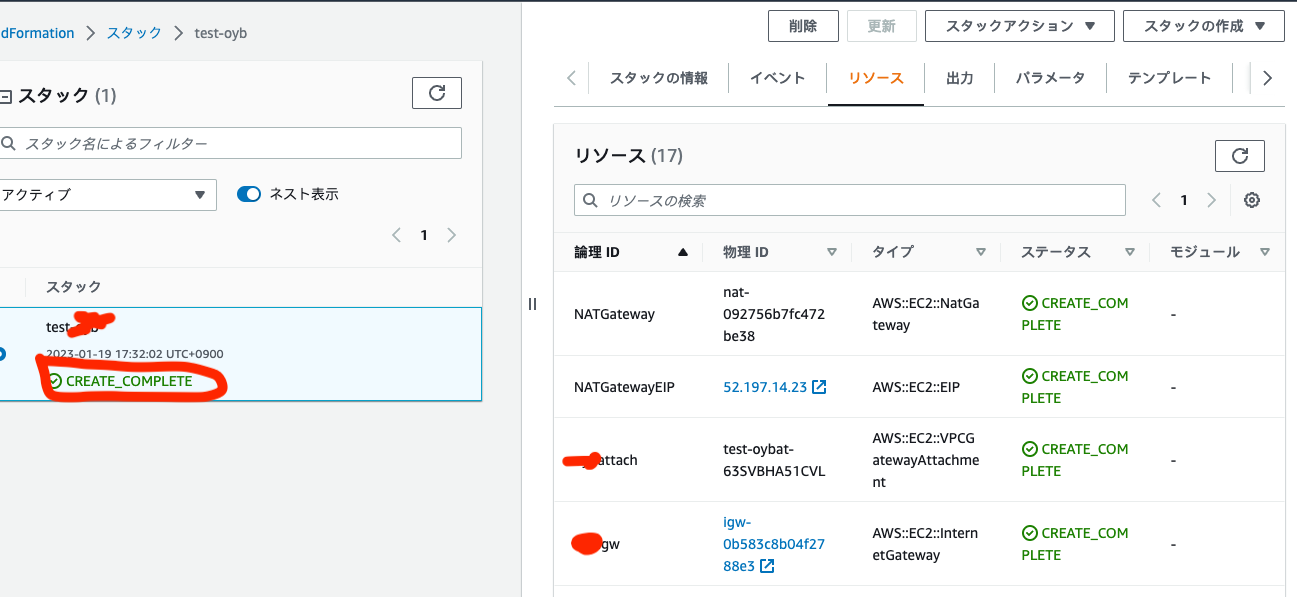
看到绿色就是跑起来了。
如果出现错误,先检查イベント里面的日志
从下往上看
检查yaml文件的格式是不是不对,是不是没引用之类的。
好了我写笔记大脑过载了!结束( ;∀;)